Sometimes you may need to run multiple instances of MariaDB database server on a single bare metal server, which support is provided with the help of the built-in utility mysqld_multi. In many cases, however, the documentation is not spot-on regarding how to utilize this tool. In this blog post, I will show you how to set up this configuration on CentOS/Almalinux/Rocky Linux 8.
Setup the MariaDB repository
To ensure that we get the latest functionality we will install MariaDB from the official repository and we will do this by using the wizard available at the MariaDB website. First we will select the distribution that we have installed on the server/instance and after that the mirror that we wish to utilize for the repository.
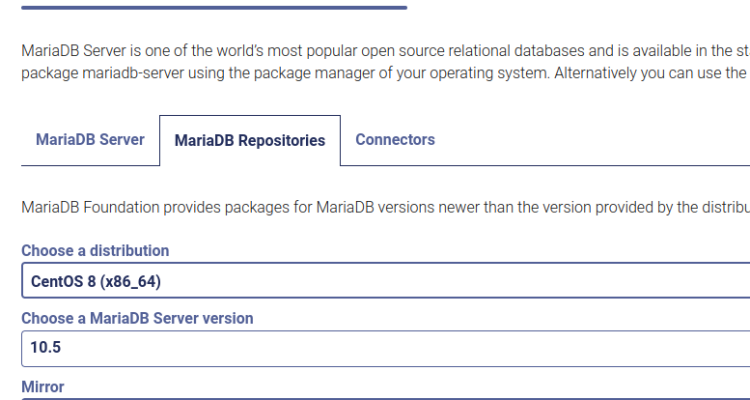
In our example we will use MariaDB 10.5, which is one of the long term support releases of the MariaDB database server.
After generating the repository snippet, we will insert the file in the repository storage for the “yum” package manager and we will do this with a text editor of our choice:
nano -w /etc/yum.repos.d/MariaDB.repo
After opening the file with the text editor we will insert the content from the MariaDB repository generator and then save the file:
# MariaDB 10.5 CentOS repository list - created 2022-11-28 07:46 UTC
# https://mariadb.org/download/
[mariadb]
name = MariaDB
baseurl = https://mirror.one.com/mariadb/yum/10.5/centos8-amd64
module_hotfixes=1
gpgkey=https://mirror.one.com/mariadb/yum/RPM-GPG-KEY-MariaDB
gpgcheck=1
Once we have pasted in the content we will save the file by pressing “CTRL + X” and then we will select that we wish to save the file.
Install the MariaDB package
Now that the repository is set up we will start to install the MariaDB services on the server/instance and we will do this by running the following commands:
yum clean all
yum -y install MariaDB-server
Once the package is installed we are ready to start with the multi server set up for the MariaDB server service.
Setup the data folders
The first thing we are going to do is to prepare the set up by first disabling the MariaDB systemd unit to ensure that there is no conflicting instance running:
systemctl stop mariadb
systemctl disable mariadb
Now we are ready to setup the data directories for the MySQL instances and we will do this with the help of a bundled script that comes with the MariaDB database server.
In our example, we will setup 3 instances with the name MySQL1-3 and therefore we will run the script for each instance we wish to setup:
mysql_install_db --user=mysql --datadir=/var/lib/mysql1
mysql_install_db --user=mysql --datadir=/var/lib/mysql2
mysql_install_db --user=mysql --datadir=/var/lib/mysql3
To ensure that the permissions are correct we will set the owner for the folders to be that of the MySQL server:
chown -R mysql.mysql /var/lib/mysql[1-3]
Set the configuration data
To start the instances of MariaDB/MySQL we are going to be utilizing a built-in script within the server software called mysqld_multi and for it to automatically spawn the instances we need to edit the server configuration.
First of all we are going to open the general server configuration with a text editor of our choice and to keep things easy in the example we will use nano:
nano /etc/my.cnf
As we are setting up 3 instances in our example we will insert the following snippet above the “[client-server]” part of the configuration file:
[mysqld_multi]
mysqld     = /usr/bin/mysqld_safe
mysqladmin = /usr/bin/mysqladmin
log    = /var/log/mysql/mysqld_multi.log
user=multi_admin
password=<a user defined password>

# MySQL1
[mysqld1]
user                    = mysql
pid-file                = /var/lib/mysql1/mysql.pid
socket                  = /var/lib/mysql1/mysql.sock
basedir                 = /usr
datadir                 = /var/lib/mysql1
tmpdir                  = /tmp
lc-messages-dir         = /usr/share/mysql
bind-address            = 127.0.0.1
port                    = 10020

# MySQL2
[mysqld2]
user                    = mysql
pid-file                = /var/lib/mysql2/mysql.pid
socket                  = /var/lib/mysql2/mysql.sock
basedir                 = /usr
datadir                 = /var/lib/mysql12
tmpdir                  = /tmp
lc-messages-dir         = /usr/share/mysql
bind-address            = 127.0.0.1
port                    = 10021

# MySQL3
[mysqld3]
user                    = mysql
pid-file                = /var/lib/mysql3/mysql.pid
socket                  = /var/lib/mysql3/mysql.sock
basedir                 = /usr
datadir                 = /var/lib/mysql3
tmpdir                  = /tmp
lc-messages-dir         = /usr/share/mysql
bind-address            = 127.0.0.1
port                    = 10022
In our example above we used a few different variables and here is a short description of what they do:
- mysqld_multi -> user & password
The user and password variables is set to handle the management of the MySQL instances governed by the mysqld_multi script. - mysqld[1-3] -> bind-address
The IP address we will bind to – in our example we used 127.0.0.1 as the service should only be accessible from localhost. - mysqld[1-3] -> port
A port of your choice over the span 0-1023 (which is reserved by the operating system).
Create the log folder
The next step is to create the log folder with the correct permissions and to do this we will first start by creating the folder:
mkdir /var/log/mysql
Once the folder is created we will create the log file that will be used by the mysqld_multi daemon:
touch /var/log/mysql/mysqld_multi.log
We will then change the permissions and ownership for the /var/log/mysql folder to ensure that the mysql user can write/read data:
chown -R mysql.mysql /var/log/mysql
Install the systemd unit for managing start/shutdown
To handle the start-up and shutdown of the mysqld_multi process we will use a small systemd unit that we will install in the /etc/systemd/system folder.
First of all we are going to create the file with a text editor, in this case nano:
nano -w /etc/systemd/system/mysqld@.service
After that we will insert the following content into the file and then save the file:
[Unit]
Description=MySQL Multi Server for instance %i
After=syslog.target
After=network.target

[Service]
User=mysql
Group=mysql
Type=forking
ExecStart=/usr/bin/mysqld_multi start %i
ExecStop=/usr/bin/mysqld_multi stop %i
Restart=always
PrivateTmp=true

[Install]
WantedBy=multi-user.target
Secure the instances and set a root password
To secure the instances we will first need to start them by starting the systemd-unit we previously created in the last step. In the commands we need to enter the instance number for the specific instance that we wish to start that we specified in the my.cnf-file and in our example we are starting all 3 instances:
systemctl enable --now mysqld@1
systemctl enable --now mysqld@2
systemctl enable --now mysqld@3
Now we need to run the “mysql_secure_installation”-process but due to that we do not abide by the standard there is some extra steps needed for it to work.
To be able to do this we are going to create a symlink for one of the instances into the /var/lib/mysql folder for the socket file so the script will work:
ln -sf /var/lib/mysql1/mysql.sock /var/lib/mysql/mysql.sock
Now can run the mysql_secure_installation command and set a root password for the first instance:
#! mysql_secure_installation

NOTE: RUNNING ALL PARTS OF THIS SCRIPT IS RECOMMENDED FOR ALL MariaDB
      SERVERS IN PRODUCTION USE!  PLEASE READ EACH STEP CAREFULLY!

In order to log into MariaDB to secure it, we'll need the current
password for the root user. If you've just installed MariaDB, and
haven't set the root password yet, you should just press enter here.

Enter current password for root (enter for none):
OK, successfully used password, moving on...

Setting the root password or using the unix_socket ensures that nobody
can log into the MariaDB root user without the proper authorisation.

You already have your root account protected, so you can safely answer 'n'.

Switch to unix_socket authentication [Y/n] Y
'Enabled successfully!
Reloading privilege tables..
 ... Success!


You already have your root account protected, so you can safely answer 'n'.

Change the root password? [Y/n]Y
New password:
Re-enter new password:
Password updated successfully!
Reloading privilege tables..
 ... Success!


By default, a MariaDB installation has an anonymous user, allowing anyone
to log into MariaDB without having to have a user account created for
them.  This is intended only for testing, and to make the installation
go a bit smoother.  You should remove them before moving into a
production environment.

Remove anonymous users? [Y/n] Y
 ... Success!

Normally, root should only be allowed to connect from 'localhost'.  This
ensures that someone cannot guess at the root password from the network.

Disallow root login remotely? [Y/n] Y
 ... Success!

By default, MariaDB comes with a database named 'test' that anyone can
access.  This is also intended only for testing, and should be removed
before moving into a production environment.

Remove test database and access to it? [Y/n] Y
 - Dropping test database...
 ... Success!
 - Removing privileges on test database...
 ... Success!

Reloading the privilege tables will ensure that all changes made so far
will take effect immediately.

Reload privilege tables now? [Y/n] Y
 ... Success!

Cleaning up...

All done!  If you've completed all of the above steps, your MariaDB
installation should now be secure.

Thanks for using MariaDB!
We will need to repeat this step for all the instances that we have created, one at a time, but before doing so we need to remove the symlink we created before each run:
unlink /var/lib/mysql/mysql.sock
Then repeat the steps for all the instances and once completed we can move to the next step.
Create the user for mysqld_multi management
When we created the my.cnf file for the server we did set a password and user in the mysqld_multi section of the configuration file. This user is used for the start/shutdown of the mysql instance and it is important that this user exists for the server to function properly.
We will now have to create that user on every instance that we have set up in the past steps:
#! mysql -S /var/lib/mysql1/mysql.sock

Welcome to the MariaDB monitor.  Commands end with ; or \g.
Your MariaDB connection id is 15
Server version: 10.5.18-MariaDB MariaDB Server

Copyright (c) 2000, 2018, Oracle, MariaDB Corporation Ab and others.

Type 'help;' or '\h' for help. Type '\c' to clear the current input statement.

MariaDB [(none)]> GRANT SHUTDOWN ON *.* TO `multi_admin`@`localhost` IDENTIFIED BY 'oursupersecretpassword';
Query OK, 0 rows affected (0.002 sec)

MariaDB [(none)]> flush privileges;
Query OK, 0 rows affected (0.000 sec)

----
#! mysql -S /var/lib/mysql2/mysql.sock

Welcome to the MariaDB monitor.  Commands end with ; or \g.
Your MariaDB connection id is 15
Server version: 10.5.18-MariaDB MariaDB Server

Copyright (c) 2000, 2018, Oracle, MariaDB Corporation Ab and others.

Type 'help;' or '\h' for help. Type '\c' to clear the current input statement.

MariaDB [(none)]> GRANT SHUTDOWN ON *.* TO `multi_admin`@`localhost` IDENTIFIED BY 'oursupersecretpassword';
Query OK, 0 rows affected (0.002 sec)

MariaDB [(none)]> flush privileges;
Query OK, 0 rows affected (0.000 sec)

---
#! mysql -S /var/lib/mysql3/mysql.sock

Welcome to the MariaDB monitor.  Commands end with ; or \g.
Your MariaDB connection id is 15
Server version: 10.5.18-MariaDB MariaDB Server

Copyright (c) 2000, 2018, Oracle, MariaDB Corporation Ab and others.

Type 'help;' or '\h' for help. Type '\c' to clear the current input statement.

MariaDB [(none)]> GRANT SHUTDOWN ON *.* TO `multi_admin`@`localhost` IDENTIFIED BY 'oursupersecretpassword';
Query OK, 0 rows affected (0.002 sec)

MariaDB [(none)]> flush privileges;
Query OK, 0 rows affected (0.000 sec)
Once we are done now we can test if the set up works as it should be restarting the services:
systemctl restart mysqld@1
systemctl restart mysqld@2
systemctl restart mysqld@3
Now we can inspect the logs and see if there is any errors:
journalctl -u mysqld@1
-- Logs begin at Mon 2022-11-28 08:26:05 CET, end at Mon 2022-11-28 10:56:32 CET. --
Nov 28 10:33:34 mysqlnode02 systemd[1]: Starting MySQL Multi Server for instance 1...
Nov 28 10:33:34 mysqlnode02 systemd[1]: Started MySQL Multi Server for instance 1.
Nov 28 10:56:23 mysqlnode02 systemd[1]: Stopping MySQL Multi Server for instance 1...
Nov 28 10:56:23 mysqlnode02 systemd[1]: mysqld@1.service: Succeeded.
Nov 28 10:56:23 mysqlnode02 systemd[1]: Stopped MySQL Multi Server for instance 1.
Nov 28 10:56:23 mysqlnode02 systemd[1]: Starting MySQL Multi Server for instance 1...
Nov 28 10:56:23 mysqlnode02 systemd[1]: Started MySQL Multi Server for instance 1.
If there is no errors you have successfully set up the mysqld_multi instances and the server should now be running.